An answer key must be created after scheduling and setting up an exam at the Testing Center.
Step One:
Sign in to the Testing Center website. Click the Faculty [1] menu and select Test Delivery Information [2].

Step Two:
Ensure that the correct semester is selected from the Year Term drop down menu, located in the top right.

Step Three:
Locate the correct course and exam. Click the exam title [1], located in the Test Setup column.

Step Four:
A dialog window appears. Scroll to the bottom and click Create Answer Key.

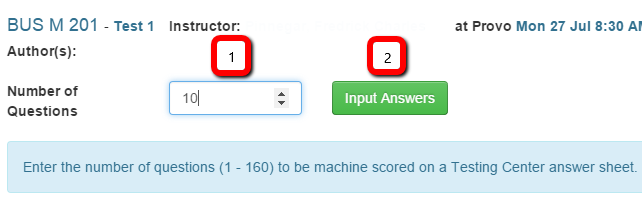
Step Five:
A dialog window appears. Enter the number of questions [1] that students will record on a Testing Center bubble sheet, and thus be scored by the Testing Center. Click Input Answers [2].
Step Six:
Enter a range of questions [1] and their point value [2]. Click apply [3].
Repeat this process for as many question ranges as needed.
In the example picture below, questions 1 - 5 have a point value of one and questions 6 - 10 have a point value of two. This bring the total points possible for the test to 15 [4].

Step Seven:
Set the correct response for each question by clicking on the appropriate response from the list of A/T through J found directly across from each question number.
A green checkmark will appear for questions that have been validated.
In the example picture below, the correct response for Q1 is A/T, Q2 is C, Q3 is G, and so forth.

Step Nine:
Click on a question number to set question settings.

Step Ten:
A dialog window appears. The following table explains the different options available on the window.
Click Close after all desired question settings have been chosen.

|
Feature |
Function |
|
Validation [1] |
If a question is validated it means it has been set up correctly in the answer key. A green checkmark signals validated questions If a question is not validated it means it has not been set up correctly in the answer key and more information is needed. A red exclamation point signals un-validated questions. |
|
Is Multiple Response [2] |
Checking the box to enable this feature will allow you to click more than one letter as the correct response. For example, if A, B, and C were clicked, students would have to mark A, B, and C to get credit for the question.
Click here for more information. |
|
Allows Partial Credit [3] |
If this feature is enabled, entry boxes will appear beneath each response option. Point values can be entered for as many response options as desired to allow for partial credit.
Click here for more information. |
|
Is Extra Credit [4] |
If this feature is enabled, the question cannot negatively impact students’ grades. If points are awarded, however, it may influence them positively.
Click here for more information. |
|
Any Answer is Correct [5] |
If this option is checked, students who answer the question will receive full credit, even if they answered the question wrong. This is a helpful tool for awarding participation points.
Click here for more information. |
|
Responses [6] |
Set the correct response for each question by clicking on the appropriate response from the list of A/T through J. |
Note: More than one question setting can be selected for an individual question.
Step Eleven (Optional):
The Quick Key Insert can also be used to set the correct response for each question.
Type in the question number you want to key in the first text entry box.
In the second entry box, type in the correct response as any letter, A-J. Multiple letters can be entered, separated by spaces, to create a multiple response question.
Hit Enter to move to the next question
Note: Remember that A corresponds to True and B corresponds to False when entering True/False questions.

Step Twelve:
Click Save Answer Key.

Step Thirteen:
An answer key must be created for each exam form. Switch between forms by selecting the desired tab at the top of the window.

Step Fourteen:
Click Next [1] or the “X” [2] to close out of the answer key dialog window.

Once the schedule has been approved and the answer key(s) set up, the test delivery sheet needs to be printed. Click here for more information about printing the test delivery sheet.
Questions? Contact the OIT Service Desk (801.422.4000, it@byu.edu).